Same Cluster, Different Mac: A Debugging Story About Unprivileged LXC Containers, iptables, and Why Cilium Replaces kube-proxy.
Part 4 of 7 — The Mac Kubernetes Lab: A Production-Mirror Setup from Scratch.

I built a four-VM Kubernetes lab on my M4 Mac. Everything worked the first time. kubeadm init finished cleanly, Calico installed without complaint, and every node went Ready within a minute. The cluster behaved exactly like a small, slightly quieter version of the EKS clusters I run at work.
Months later, on a whim, I tried to put the same setup on my old M1 Pro. The VMs came up. kubeadm init succeeded. I applied the Calico manifests. Nothing worked!
Nodes stayed NotReady indefinitely. kube-proxy crashed in a loop. The tigera-operator pod kept logging the same line:
dial tcp 10.96.0.1:443: connect: connection refused
That’s the Kubernetes API server’s ClusterIP, the address every system component uses to talk to the cluster from inside the cluster. It should always be reachable. It wasn’t.
I spent the evening trying every CNI option I knew, then reading kernel source code I’d never had a reason to look at. What I found was a kernel capability difference between Apple Silicon generations that probably affects more setups than just mine. This is the walkthrough I wish I had when I started debugging.
The setup before things broke:
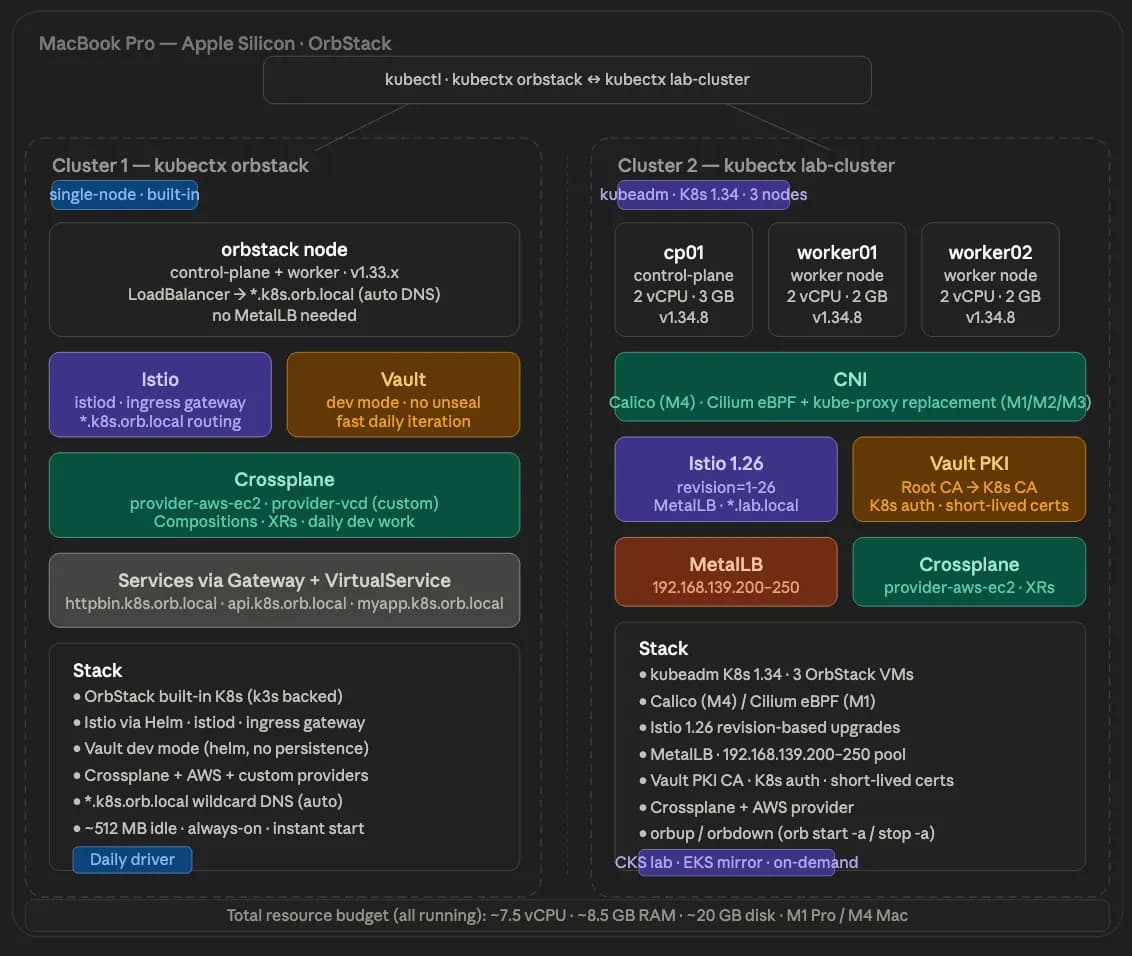
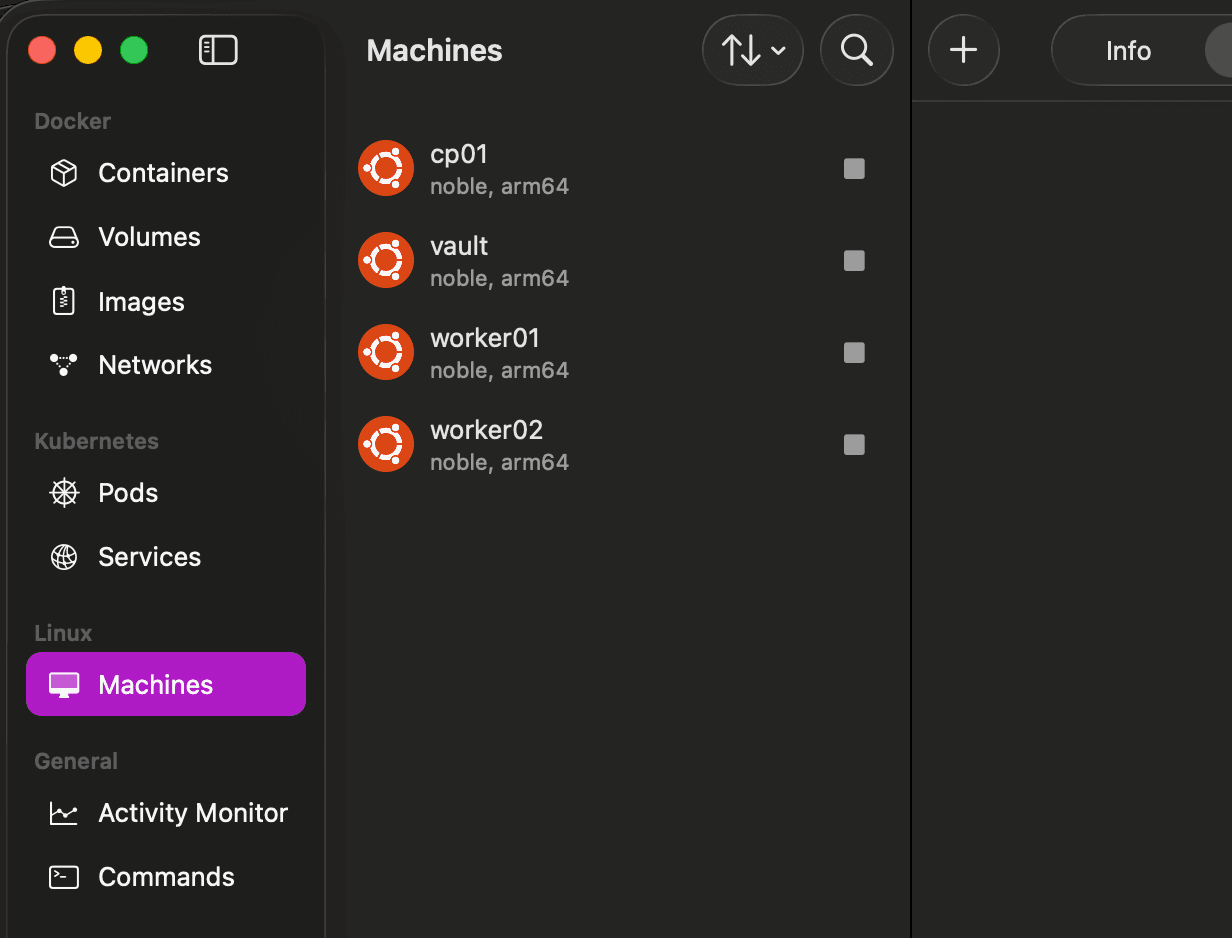
Quick recap of where we are in the series. We’re standing up Kubernetes 1.34 via kubeadm on four OrbStack VMs:
vault— runs HashiCorp Vault as the cluster's certificate authoritycp01— the control plane nodeworker01andworker02— workers Parts 2 and 3 built the supporting pieces: the native OrbStack cluster, the Vault PKI with a Root CA and a Kubernetes Intermediate CA, and the four VMs themselves. By the time we get tokubeadm init, the CA cert and key are already at/etc/kubernetes/pki/ca.crtand/etc/kubernetes/pki/ca.keyoncp01, ready for kubeadm to pick up.
What I’m about to walk through happened on both my M4 and my M1. The pre-reqs and the kubeadm init are identical on both. The CNI choice is what diverges.
Pre-reqs on the three Kubernetes nodes.
Run this on cp01, worker01, and worker02. The minimal OrbStack Ubuntu image is missing a few packages, and the order matters,install gpg before adding the Kubernetes apt repo, or you'll end up with a broken, unsigned repo entry that blocks every future apt update.
# 🖥️ VM: all nodes (cp01, worker01, worker02)

# Disable swap
sudo swapoff -a && sudo sed -i '/swap/d' /etc/fstab

# Kernel modules
cat <<EOF | sudo tee /etc/modules-load.d/k8s.conf
overlay
br_netfilter
EOF
sudo modprobe overlay br_netfilter

# Sysctl for bridge networking
cat <<EOF | sudo tee /etc/sysctl.d/k8s.conf
net.bridge.bridge-nf-call-iptables  = 1
net.bridge.bridge-nf-call-ip6tables = 1
net.ipv4.ip_forward                 = 1
EOF
sudo sysctl --system

# containerd
sudo apt update && sudo apt install -y containerd
sudo mkdir -p /etc/containerd
containerd config default | sudo tee /etc/containerd/config.toml
sudo sed -i 's/SystemdCgroup = false/SystemdCgroup = true/' /etc/containerd/config.toml
sudo systemctl restart containerd && sudo systemctl enable containerd

# Clean any stale K8s repo entries before adding the new one
sudo rm -f /etc/apt/sources.list.d/kubernetes.list
sudo rm -f /etc/apt/keyrings/kubernetes-apt-keyring.gpg
sudo apt update && sudo apt install -y gpg curl apt-transport-https ca-certificates
sudo mkdir -p /etc/apt/keyrings

# K8s 1.34 repo
curl -fsSL https://pkgs.k8s.io/core:/stable:/v1.34/deb/Release.key \
  | sudo gpg --dearmor -o /etc/apt/keyrings/kubernetes-apt-keyring.gpg
echo "deb [signed-by=/etc/apt/keyrings/kubernetes-apt-keyring.gpg] \
  https://pkgs.k8s.io/core:/stable:/v1.34/deb/ /" \
  | sudo tee /etc/apt/sources.list.d/kubernetes.list

sudo apt update && sudo apt install -y kubelet kubeadm kubectl

sudo apt-mark hold kubelet kubeadm kubectl

kubectl version --client && kubeadm version
Two things worth flagging from experience. First, the Kubernetes apt repo URL pattern is core:/stable:/v1.34/deb/ - note the colons. Get one wrong, and you'll spend ten minutes wondering why apt is returning a 404. Second, if you skip the cleanup step and your previous attempt left a broken repo entry, the apt update after adding the new repo will fail silently, and apt install kubelet will install nothing useful.
kubeadm init on cp01.
Two things to know about the config:
The API version is v1beta4 in kubeadm 1.34. The old v1beta3 is deprecated and will warn. The KubeletConfiguration group also changed from kubelet.kubeadm.k8s.io to kubelet.config.k8s.io. If you're copying a kubeadm config from an older tutorial, both of those need updating.
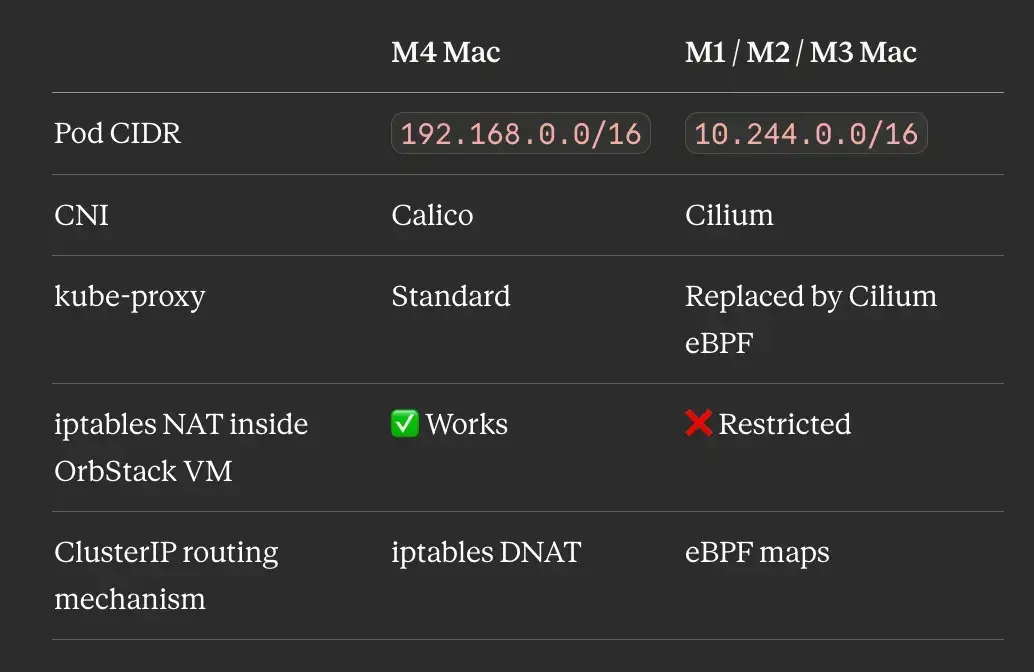
The pod CIDR depends on the CNI. Use 10.244.0.0/16 for Cilium (M1) or 192.168.0.0/16 for Calico (M4). These are each CNI's default; getting it wrong here means re-running kubeadm reset later, which is no fun.
# 🖥️ VM: cp01
# Set CP_IP explicitly - VM environment vars don't persist across sessions
export CP_IP=\((hostname -I | awk '{print \)1}')
echo "CP_IP=$CP_IP" # verify - an empty value here causes "not a valid IP address" later
sudo tee /tmp/kubeadm-config.yaml <<EOF
apiVersion: kubeadm.k8s.io/v1beta4
kind: InitConfiguration
localAPIEndpoint:
advertiseAddress: "$CP_IP"
bindPort: 6443
nodeRegistration:
criSocket: unix:///run/containerd/containerd.sock
---
apiVersion: kubeadm.k8s.io/v1beta4
kind: ClusterConfiguration
kubernetesVersion: "1.34.0"
controlPlaneEndpoint: "$CP_IP:6443"
networking:
podSubnet: "10.244.0.0/16" # M1 + Cilium: 10.244.0.0/16 | M4 + Calico: 192.168.0.0/16
serviceSubnet: "10.96.0.0/12"
apiServer:
certSANs:
- "$CP_IP"
- "cp01"
- "cp01.lab.local"
- "kubernetes"
- "127.0.0.1"
- "10.96.0.1"
---
apiVersion: kubelet.config.k8s.io/v1beta1
kind: KubeletConfiguration
cgroupDriver: systemd
EOF
grep advertiseAddress /tmp/kubeadm-config.yaml # sanity check before running init
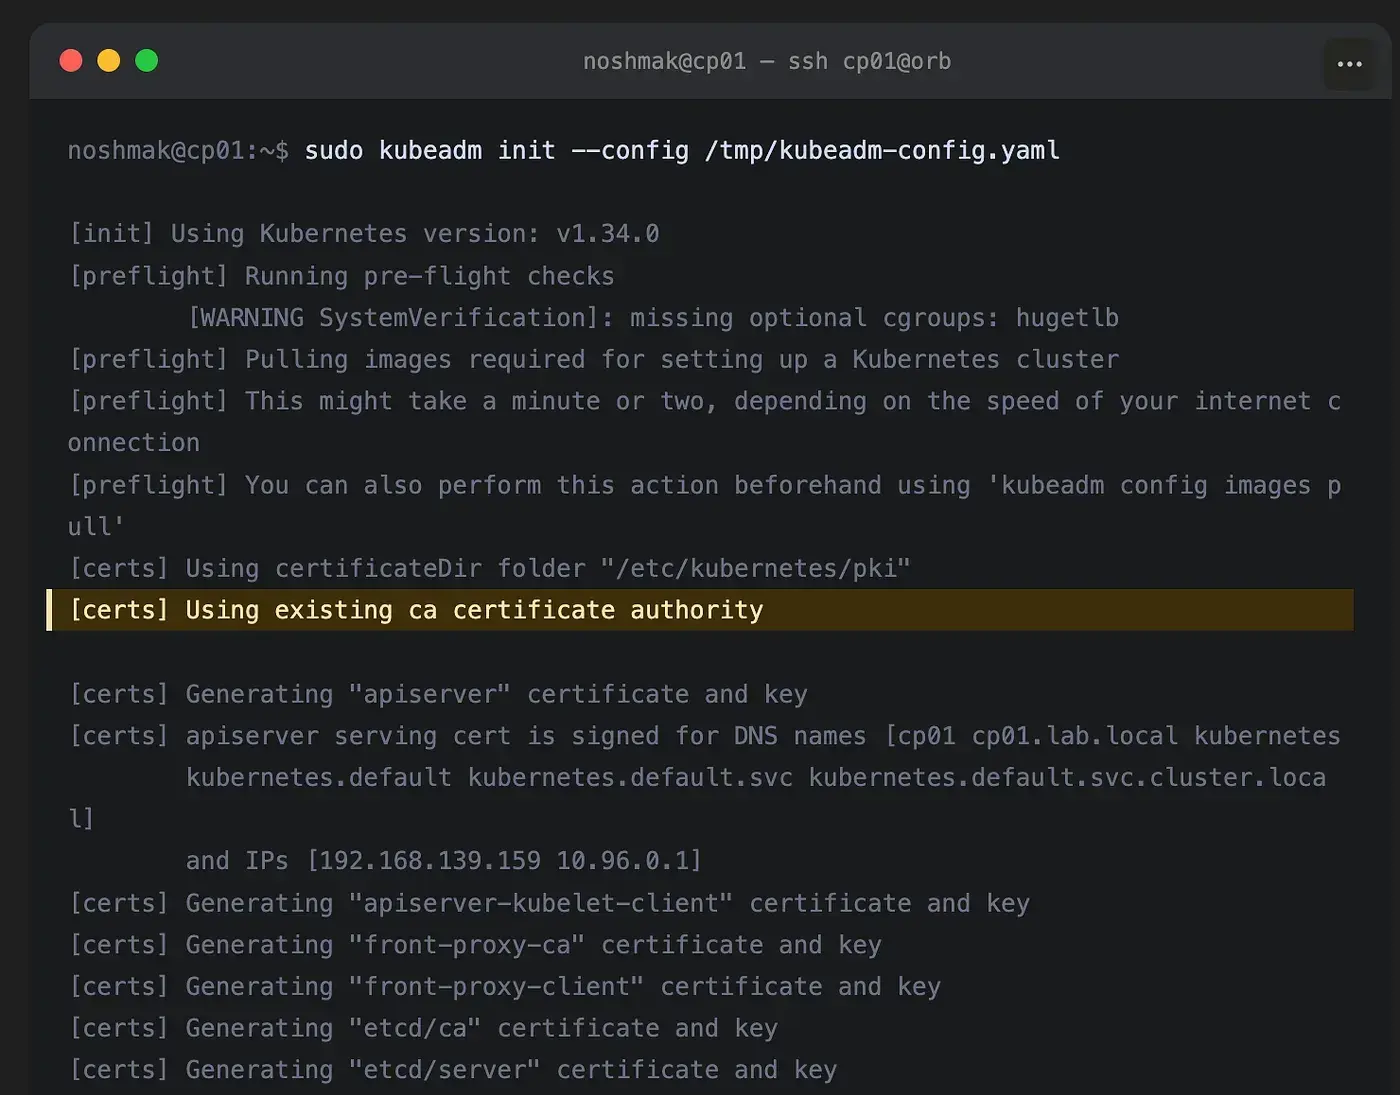
sudo kubeadm init --config /tmp/kubeadm-config.yaml
mkdir -p $HOME/.kube
sudo cp /etc/kubernetes/admin.conf $HOME/.kube/config
sudo chown \((id -u):\)(id -g) $HOME/.kube/config
Because the CA cert and key are already at /etc/kubernetes/pki/ from Part 3, kubeadm detects them and uses the Vault-managed CA instead of generating self-signed certs. You'll see:
[certs] Using existing ca certificate authority
This is the moment I always pause and verify. If kubeadm says “Generating ca certificate”, something went wrong with the CA distribution step in Part 3, most likely the file permissions on ca.key, which has to be 0600.
The CNI fork in the road!
This is where the M1 and M4 paths split.
On M4 Calico, the obvious choice.
Calico is the straightforward, well-trodden answer on M4. Full iptables support, BGP routing, NetworkPolicy enforcement. It mirrors what most production EKS clusters use (modulo the AWS VPC CNI specifics).
# 🖥️ VM: cp01 (M4)
kubectl create -f https://raw.githubusercontent.com/projectcalico/calico/v3.28.0/manifests/tigera-operator.yaml
kubectl create -f https://raw.githubusercontent.com/projectcalico/calico/v3.28.0/manifests/custom-resources.yaml

# Verify:
kubectl get pods -n calico-system -w
kubectl get nodes -w
Nodes flip to Ready within 60–90 seconds of the Calico pods running. This is the path I expected to work everywhere.
On M1, Calico fails, and figuring out why takes a while!
Here’s what I saw on the M1 when I ran the exact Calico installation:
tigera-operator pod logs:
  dial tcp 10.96.0.1:443: connect: connection refused

kube-proxy pod events:
  open /proc/sys/net/netfilter/nf_conntrack_max: permission denied
  iptables: No chain/target/match by that name.

node status:
  cp01       NotReady    control-plane
  worker01   NotReady    <none>
  worker02   NotReady    <none>
The kube-proxy line is the one that turned out to matter. Permission denied writing to /proc/sys/net/netfilter/nf_conntrack_max. That's a kernel-level write. Something about the container environment was preventing kube-proxy from touching netfilter state.
After enough digging through OrbStack’s docs and the LXC documentation, the pieces fell into place. OrbStack VMs are unprivileged LXC containers.
On M4, the LXC container’s capability set allows the netfilter and iptables NAT modifications that kube-proxy needs.
On M1, M2, and M3, that capability set is more restricted — kube-proxy can’t write the iptables KUBE-SERVICES chain.
The downstream failure chain:
kubeadm initcompletes. The API server is running and reachable via the node IP.kube-proxy starts. It tries to write iptables NAT rules so that
10.96.0.1:443(the Kubernetes API ClusterIP) is DNAT'd to the API server's real address.The write fails. The
KUBE-SERVICESchain never gets populated.10.96.0.1is unreachable from inside the cluster.Every CNI plugin that needs to call the Kubernetes API via the ClusterIP fails to initialise. Calico’s tigera-operator is one of them.
Nodes never go
Ready.
So Calico isn’t the problem. kube-proxy is the problem. And kube-proxy is the problem because the container runtime isn’t giving it the capabilities it needs.
This is where Cilium comes in.
Why Cilium fixes this!
Cilium is a CNI that uses eBPF programs loaded directly into the kernel instead of iptables. The eBPF programs implement service routing. What kube-proxy normally does with iptables, Cilium does with eBPF maps, and they don’t need the iptables NAT capability to function.
Cilium also has a kubeProxyReplacement mode that completely replaces kube-proxy. No kube-proxy, no failing iptables writes, no broken ClusterIP routing.
On a Mac where iptables NAT works fine, this is just a different way to do the same thing. On an M1, it’s the difference between a working cluster and a broken one.
Installing Cilium on M1.
# 🖥️ VM: cp01 (M1)

# Step 1 - Remove kube-proxy entirely. Cilium will replace it.
kubectl -n kube-system delete daemonset kube-proxy 2>/dev/null || true
kubectl -n kube-system delete configmap kube-proxy 2>/dev/null || true

# Step 2 - Install Cilium CLI
curl -L --fail --remote-name-all \
  https://github.com/cilium/cilium-cli/releases/latest/download/cilium-linux-arm64.tar.gz
sudo tar xzvfC cilium-linux-arm64.tar.gz /usr/local/bin
rm cilium-linux-arm64.tar.gz

# Step 3 - Install Cilium with kubeProxyReplacement enabled
export CP_IP=\((hostname -I | awk '{print \)1}')
cilium install \
  --set kubeProxyReplacement=true \
  --set k8sServiceHost=$CP_IP \
  --set k8sServicePort=6443

# Step 4 - Wait for Cilium to be fully up
cilium status --wait
Two flags are non-negotiable here. kubeProxyReplacement=true is what tells Cilium to handle service routing itself via eBPF. k8sServiceHost=$CP_IP and k8sServicePort=6443 give Cilium the real address of the API server so it doesn't try to reach it via the broken ClusterIP. Without those, Cilium itself can't bootstrap.
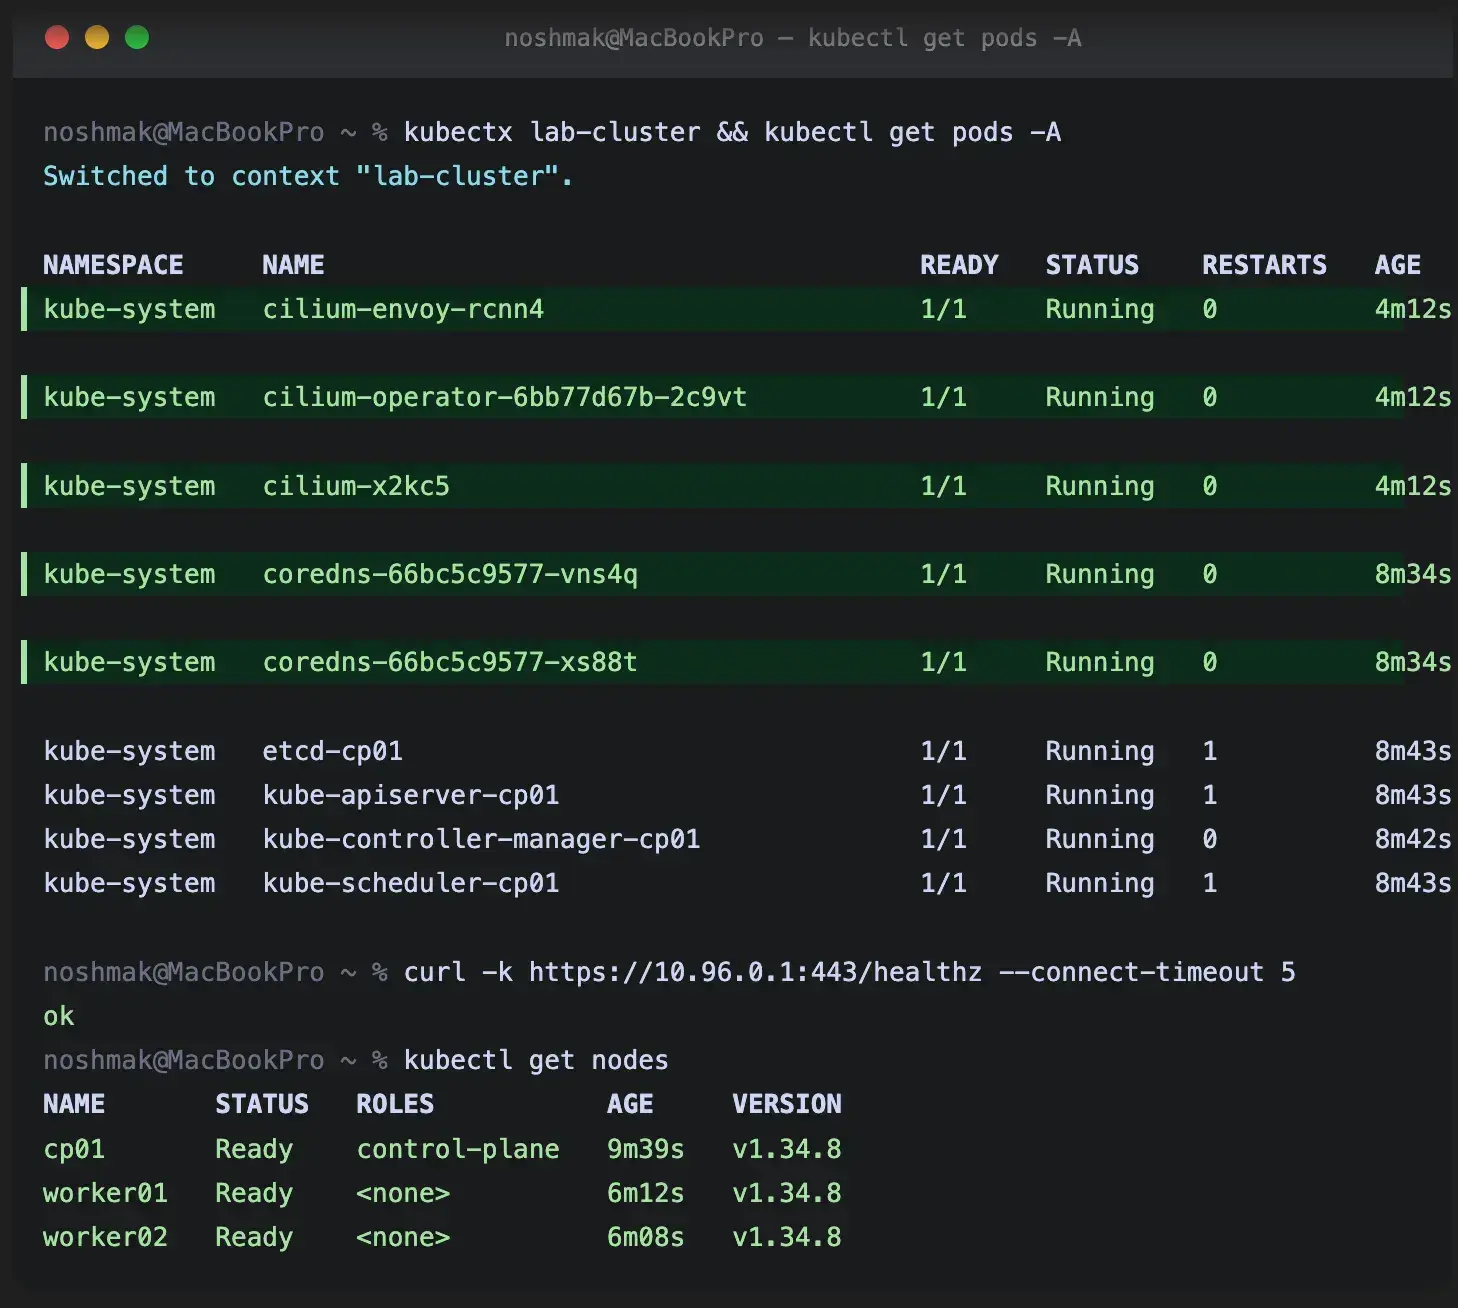
The verification step that matters:
# 🖥️ VM: cp01
curl -k https://10.96.0.1:443/healthz --connect-timeout 5
# Expected: ok
If that curl returns ok, the eBPF service routing is working and the cluster is functional. CoreDNS will come up. System pods will go Ready. The cluster is real.
# 🖥️ VM: cp01
kubectl get pods -A -w
Joining the workers
# 🖥️ VM: cp01 — generate the join command
kubeadm token create --print-join-command
Run on worker01 then worker02:
# 🖥️ VM: worker01 and worker02 (run on each)
sudo kubeadm reset -f
sudo rm -rf /etc/cni/net.d /var/lib/cni

# Paste the join command from cp01
sudo kubeadm join <cp01-ip>:6443 --token <token> \
  --discovery-token-ca-cert-hash sha256:<hash> \
  --cri-socket unix:///run/containerd/containerd.sock
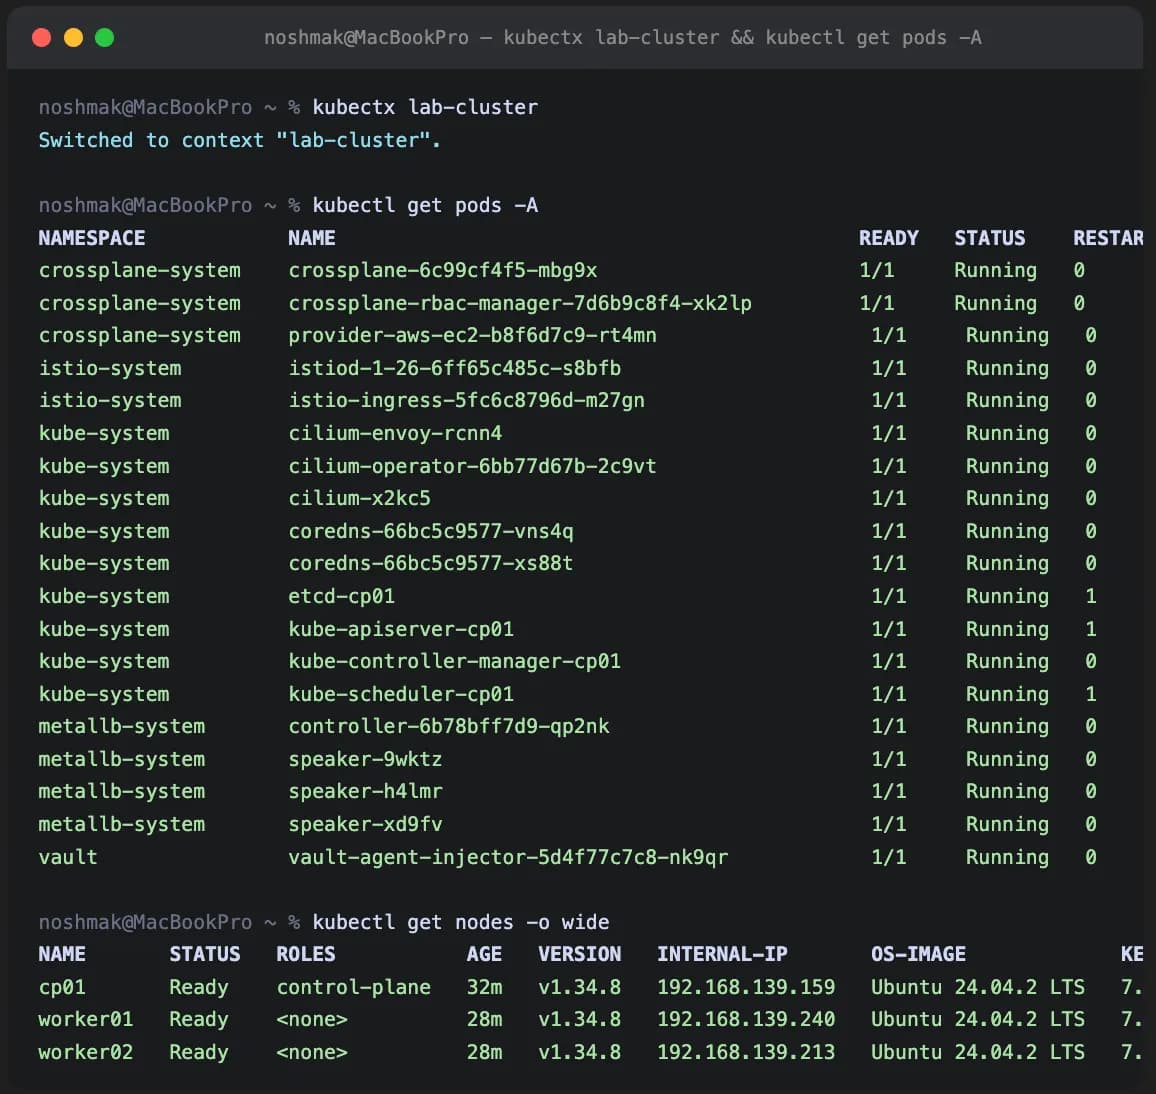
# 🖥️ VM: cp01 — watch nodes come up
kubectl get nodes -w
# NAME       STATUS   ROLES           VERSION
# cp01       Ready    control-plane   v1.34.x
# worker01   Ready    <none>          v1.34.x
# worker02   Ready    <none>          v1.34.x
Getting the kubeconfig onto your Mac.
The detail that catches everyone out: copy from ~/.kube/config on cp01, not /etc/kubernetes/admin.conf. The admin.conf requires sudo, and orb run injects extra output that corrupts the YAML.
Also, every fresh kubeadm init rotates the certificates. You have to re-copy the kubeconfig after every init - if you skip this step, you'll get "the server has asked for the client to provide credentials" and spend twenty minutes confused about why your perfectly good cluster is rejecting you.
# 💻 Mac
# Copy from the user kubeconfig - NOT /etc/kubernetes/admin.conf
ssh cp01@orb "cat ~/.kube/config" > /tmp/lab-kubeconfig.yaml
head -5 /tmp/lab-kubeconfig.yaml   # must start with: apiVersion: v1

# Remove ALL stale entries - including the user object
kubectl config delete-context lab-cluster 2>/dev/null || true
kubectl config delete-cluster kubernetes 2>/dev/null || true
kubectl config delete-user kubernetes-admin 2>/dev/null || true

# Rename and merge
kubectl --kubeconfig /tmp/lab-kubeconfig.yaml \
  config rename-context kubernetes-admin@kubernetes lab-cluster
KUBECONFIG=~/.kube/config:/tmp/lab-kubeconfig.yaml \
  kubectl config view --flatten > /tmp/merged-kube.yaml
cp /tmp/merged-kube.yaml ~/.kube/config

# Update the server IP to the cp01 VM IP
export CP_IP=\((orb run -m cp01 hostname -I | awk '{print \)1}')
kubectl config set-cluster kubernetes --server=https://$CP_IP:6443
kubectx lab-cluster
kubectl get nodes
Verifying the Vault CA is actually in use. This is the part that confirms the whole certificate hierarchy we built in Part 3 is working end-to-end. The cluster certs should be signed by the Vault Intermediate CA, not kubeadm’s default self-signed CA:
# 🖥️ VM: cp01
openssl x509 -in /etc/kubernetes/pki/apiserver.crt -noout -issuer
# issuer=CN=Lab K8s Intermediate CA

openssl x509 -in /etc/kubernetes/pki/ca.crt -noout -subject
# subject=CN=Lab K8s Intermediate CA
If those don’t match what’s in Vault, something went wrong in the CA distribution, and you’re probably running with a self-signed kubeadm CA, which works, but it’s not what we set out to build.
The summary I wish I had:
The general lesson, which is worth more than the specific OrbStack/Apple Silicon story: anywhere you’re running Kubernetes inside an unprivileged Linux container — OrbStack, LXC on a server, certain Docker-in-Docker setups, some CI environments — iptables NAT may not work, and a kube-proxy-replacing CNI like Cilium is the move. I went into this thinking I had an Apple Silicon problem. What I had was a Linux container capability problem that happens to show up most loudly on Apple Silicon today.
In Part 5, we install Istio with revision-based upgrades and MetalLB to give this cluster real LoadBalancer IPs, the same upgrade pattern I use on the production EKS clusters this lab is mirroring.
← Part 3: Building a Production-Grade Vault PKI for a Local kubeadm Cluster Without the Shortcuts | Part 5: How I Practise Istio Upgrades Locally Before Touching Production EKS →
I’m Noah Makau, a DevSecOps engineer based in Nairobi. I run a small DevOps consultancy and hold CKA, CKAD, and the AWS Solutions Architect Professional certifications, currently preparing for CKS. I write about Kubernetes, Vault, Crossplane, and the day-to-day of running platforms that actually have to stay up.