The Day 2 Reality of Running a Kubernetes Lab on Your Mac: Stop/Start, CKS Scenarios, and What I Learned Building It.
Part 7 of 7 — The Mac Kubernetes Lab: A Production-Mirror Setup from Scratch.
Previously in Part 6: We wired up Vault Kubernetes auth, installed Crossplane with the AWS provider, and applied LimitRanges mirroring the production configuration that resulted from a real disk-pressure incident. The EKS mirror is complete. Now we focus on Day 2 — actually using the thing sustainably.
There’s a question I had when I first put this lab together that nobody had answered for me cleanly: Will my cluster survive a stop?
You’re going to want to stop it. The whole point of a local lab is that it gets out of your way when you’re not using it. A four-VM cluster running 24/7 is fine on paper, but you’ve also got Slack, six browser tabs, and an IDE eating memory. Knowing exactly what survives a stop, and what doesn't, and what manual steps you need on the way back up is the difference between "lab I use every day" and "lab I built once and abandoned."
This final article is the runbook I wish I had at the start. Stop/start without losing state, CKS exam scenarios this cluster is purposely built for, and the shell setup that makes the whole thing pleasant to live with.
The full setup, recapped:
Seven articles in, here’s what’s running:

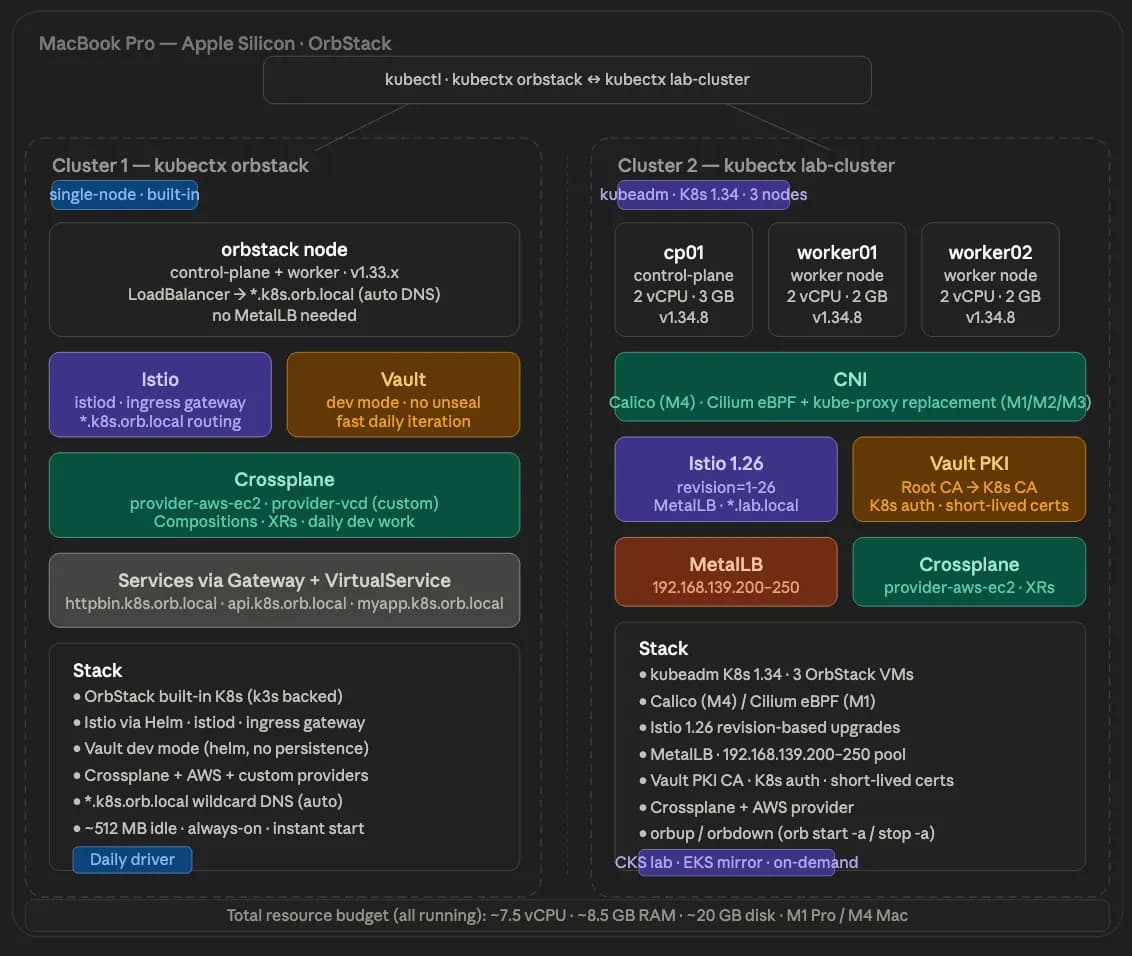
Cluster 1 — kubectx orbstack
- OrbStack-native K8s, single-node
- Istio with *.k8s.orb.local wildcard DNS
- Vault in dev mode
- Crossplane
- Always-on, idles at around 512 MB
###Cluster 2 — kubectx lab-cluster
- kubeadm Kubernetes 1.34, 3 nodes
- Vault PKI (3-tier hierarchy, exported intermediate CA)
- Istio 1.26 revision-based, MetalLB for LoadBalancer
- Crossplane with the AWS provider
- Vault Kubernetes auth
- Run on-demand
Stop/start without losing state
The biggest question I had when I first set this up was the one I led with — will the cluster survive a stop? The answer is yes, with one exception.
Stopping
# 💻 Mac
orb stop -a      # stop all VMs
orb stop k8s     # stop the native cluster (optional — fine to leave running)
What persists:
- All Kubernetes objects — deployments, services, configmaps, secrets, PVCs
- etcd data on cp01 (stored on the VM’s disk)
- Vault data at /opt/vault/data (file backend, persists on disk)
- Calico/Cilium, Istio, Crossplane, MetalLB configurations
- The Mac kubeconfig
What is released:
- All CPU — drops to zero immediately
- All RAM — fully returned to macOS
- ~8 GB of disk remains used.
Starting back up
# 💻 Mac
orb start -a
Then follow these steps in order:
Step 1 — Unseal Vault. This is the one manual step that can’t be automated away:
# 🖥️ VM: vault
export VAULT_ADDR='http://127.0.0.1:8200'
vault operator unseal \((grep 'Unseal Key 1' ~/vault-init.txt | awk '{print \)NF}')
vault status
# Sealed: false ← what you want
Vault seals itself on every shutdown by design. That’s a security feature; an unsealed Vault that survives reboots is, by definition, less secure. In production, you’d use auto-unseal with AWS KMS or Azure Key Vault. For the lab, one manual unseal command is fine.
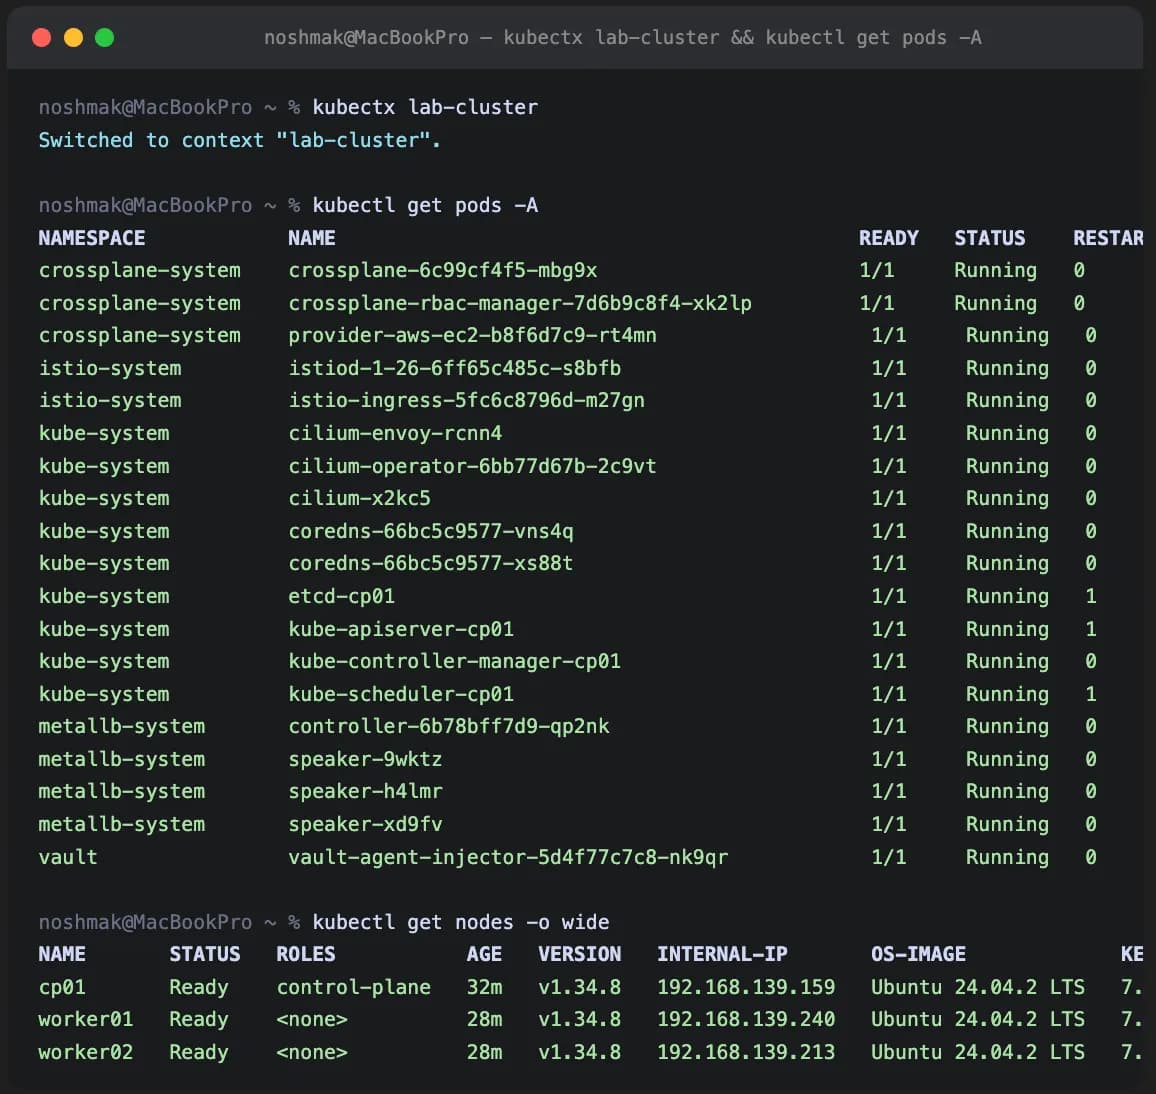
Step 2 — Verify the cluster:
# 💻 Mac
kubectx lab-cluster
kubectl get nodes   # Ready within ~30 seconds
kubectl get pods -A # everything restarts automatically
Step 3 — Re-export session variables: This is the friction I underestimated when I started. Environment variables don’t persist across SSH sessions anything you exported in a previous session is gone:
# 🖥️ VM: vault (when doing PKI or auth work)
export VAULT_ADDR='http://127.0.0.1:8200'
export VAULT_ROOT_TOKEN=\((grep 'Initial Root Token' ~/vault-init.txt | awk '{print \)NF}')
# 🖥️ VM: cp01 (when doing kubeadm or cert work)
export CP_IP=\((hostname -I | awk '{print \)1}')
# 💻 Mac (when doing Istio or MetalLB work)
export VAULT_IP=\((orb run -m vault hostname -I | awk '{print \)1}')
export INGRESS_IP=$(kubectl get svc istio-ingress -n istio-system \
  -o jsonpath='{.status.loadBalancer.ingress[0].ip}')
Step 4 — Regenerate /tmp files if needed. /tmp on OrbStack VMs clears on reboot:
# 🖥️ VM: vault
vault read -field=certificate pki_k8s/issuer/default > /tmp/lab-ca.crt
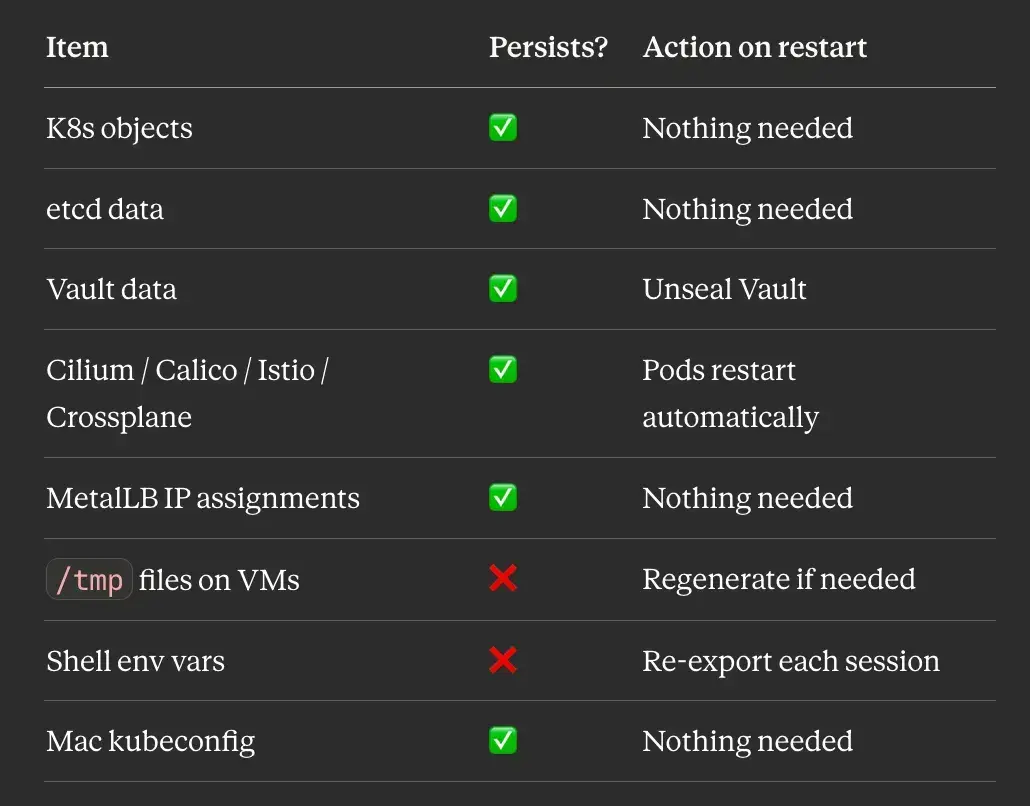
Persistence quick reference
Shell setup that makes it pleasant
Put these in your ~/.zshrc:
# 💻 Mac — add to ~/.zshrc
alias klab="kubectx lab-cluster"
alias korb="kubectx orbstack"
alias kns="kubens"
alias k="kubectl"
alias kgp="kubectl get pods -A"
alias kgn="kubectl get nodes -o wide"
alias orbup="orb start -a"
alias orbdown="orb stop -a"
Daily flow becomes short:
orbup               # start everything
ssh vault@orb       # unseal Vault
vault operator unseal \((grep 'Unseal Key 1' ~/vault-init.txt | awk '{print \)NF}')
# exit vault VM
klab                # switch to lab cluster
kgn                 # verify nodes
kgp                 # verify pods
CKS exam preparation:
The VM lab cluster is purpose-built for CKS. Real kubeadm cluster, real etcd, real kubelet config files. The exam gives you a similar environment, and having practiced the same scenarios on a cluster where you control every layer makes a meaningful difference.
The scenarios I practice most:
Pod Security Admission:
PSA replaced PodSecurityPolicy in Kubernetes 1.25. The CKS exam tests your ability to enforce pod security standards at the namespace level.
# 💻 Mac
kubectl create namespace restricted-ns

# Enforce the restricted profile - blocks privilege escalation, host networking, etc.
kubectl label namespace restricted-ns \
  pod-security.kubernetes.io/enforce=restricted \
  pod-security.kubernetes.io/audit=restricted \
  pod-security.kubernetes.io/warn=restricted

# Test - this pod should be blocked
kubectl run test --image=nginx -n restricted-ns
# Error from server (Forbidden): pods "test" is forbidden: violates PodSecurity
RBAC
# 💻 Mac
 # Create a role that can only read pods
kubectl create role pod-reader \
  --verb=get,list,watch \
  --resource=pods \
  -n restricted-ns

# Bind it to a service account
kubectl create rolebinding pod-reader-binding \
  --role=pod-reader \
  --serviceaccount=restricted-ns:default \
  -n restricted-ns

# Test with impersonation
kubectl auth can-i list pods \
  --as=system:serviceaccount:restricted-ns:default \
  -n restricted-ns
# yes

kubectl auth can-i delete pods \
  --as=system:serviceaccount:restricted-ns:default \
  -n restricted-ns
# no
Audit policy:
The exam often asks you to configure an audit policy on the control plane. This requires editing the kube-apiserver static pod manifest directly:
# 🖥️ VM: cp01
sudo tee /etc/kubernetes/audit-policy.yaml <<EOF
apiVersion: audit.k8s.io/v1
kind: Policy
rules:
- level: RequestResponse
  resources:
  - group: ""
    resources: ["secrets"]
- level: Metadata
  resources:
  - group: ""
    resources: ["pods"]
- level: None
  users: ["system:kube-proxy"]
EOF
Add these flags to /etc/kubernetes/manifests/kube-apiserver.yaml:
- --audit-policy-file=/etc/kubernetes/audit-policy.yaml
- --audit-log-path=/var/log/kubernetes/audit.log
- --audit-log-maxage=30
- --audit-log-maxbackup=10
The kubelet restarts kube-apiserver automatically when the manifest changes.
NetworkPolicy: default-deny
# 💻 Mac
# Deny all ingress and egress by default
kubectl apply -f - <<EOF
apiVersion: networking.k8s.io/v1
kind: NetworkPolicy
metadata:
  name: default-deny-all
  namespace: default
spec:
  podSelector: {}
  policyTypes:
  - Ingress
  - Egress
EOF
# Then selectively allow what's needed
kubectl apply -f - <<EOF
apiVersion: networking.k8s.io/v1
kind: NetworkPolicy
metadata:
  name: allow-dns
  namespace: default
spec:
  podSelector: {}
  policyTypes:
  - Egress
  egress:
  - ports:
    - port: 53
      protocol: UDP
    - port: 53
      protocol: TCP
EOF
Short-lived admin certificates from Vault PKI
A CKS best practice — use short-lived credentials instead of long-lived kubeconfig files:
# 🖥️ VM: vault
# Issue a 1-hour admin certificate
vault write pki_k8s/issue/admin \
  common_name="kubernetes-admin" ttl=1h
The output gives you a certificate and private key. Build a kubeconfig from them that expires in one hour. Instead of a kubeconfig with a long-lived client cert, you issue a fresh cert each session. When it expires, access is revoked automatically. In production, this is enforced at the Vault role level (max_ttl=2h) you physically cannot issue a cert with a longer TTL.
Trivy image scanning
CKS includes container image security. Trivy is the tool used on the exam:
# 🖥️ VM: cp01 — install trivy
curl -sfL https://raw.githubusercontent.com/aquasecurity/trivy/main/contrib/install.sh | sudo sh -s -- -b /usr/local/bin

# Scan an image
trivy image nginx:latest

# Scan for HIGH and CRITICAL only
trivy image --severity HIGH,CRITICAL nginx:latest
Five things I learned building this
OrbStack is genuinely better than Multipass, not just faster. The native DNS, instant boot, and real LoadBalancer IPs remove an entire category of friction I had normalised. I didn’t realise how much time I was spending on /etc/hosts edits until I stopped having to do them.
The M1 vs M4 CNI difference is a kernel capability issue, not an OrbStack bug. Once I understood that iptables NAT is restricted in unprivileged LXC containers on M1, Cilium was the obvious fix. Knowing this also makes it easier to debug similar issues in other restricted container environments; CI systems, Docker-in-Docker, anywhere Kubernetes is running inside something it doesn’t quite own.
**Vault PKI is worth the setup cost. **You could let kubeadm generate self-signed certs and skip a whole chapter. But having a lab that uses the same certificate hierarchy as production means the mental model transfers directly. Short-lived admin certs stop being a theoretical best practice and start being how you actually work.
Session variables are the biggest day-to-day friction. Anything that doesn’t persist to .bashrc gets lost between sessions. I've been burned by an empty $CP_IP, causing a "not a valid IP address" error in the kubeadm config more times than I'd like to admit. Persist in what you can.
Document as you go. This whole series came out of runbook notes I was writing for myself while I built the lab. Writing each step down caught several places where the process was more manual than it needed to be, and meant I could replicate the setup on another machine in a day instead of a weekend. If you’ve built something complicated, writing it up is one of the higher-leverage things you can do, even if you never publish it.
The full series
Part 1: Why I Replaced Multipass with OrbStack and what an M1 vs M4 Mac taught me about local Kubernetes. Part 2: One Command, One Working Kubernetes Cluster! Building My Daily-Driver Lab on OrbStack. Part 3: Building a Production-Grade Vault PKI for a Local kubeadm Cluster Without the Shortcuts. Part 4: Same Cluster, Different Mac: A Debugging Story About Unprivileged LXC Containers, iptables, and Why Cilium Replaces kube-proxy. Part 5: How I Practise Istio Upgrades Locally Before Touching Production EKS. Part 6: The Disk-Pressure Incident That Taught Me to Always Set LimitRanges and Other Lessons from Mirroring EKS Locally. Part 7 (this article): The Day 2 Reality of Running a Kubernetes Lab on Your Mac: Stop/Start, CKS Scenarios, and What I Learned Building It.
Resources
- OrbStack documentation
- OrbStack pricing — free for personal use, paid for commercial/team use
- Cilium installation guide
- Vault Kubernetes auth documentation
- Crossplane documentation
- Istio revision-based upgrades
- CKS curriculum
← Part 6: The Disk-Pressure Incident That Taught Me to Always Set LimitRanges and Other Lessons from Mirroring EKS Locally.
I’m Noah Makau, a DevSecOps engineer based in Nairobi. I run a small DevOps consultancy and hold CKA, CKAD, and the AWS Solutions Architect Professional certifications, currently preparing for CKS. I write about Kubernetes, Vault, Crossplane, and the day-to-day of running platforms that actually have to stay up.